Texas Railroad History - Towers 25, 26 and 207 - Houston
Three Towers on the Texas & New Orleans Railroad in North Houston

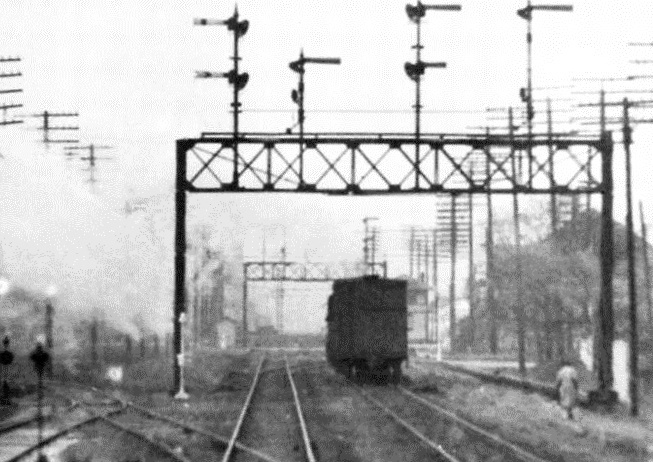
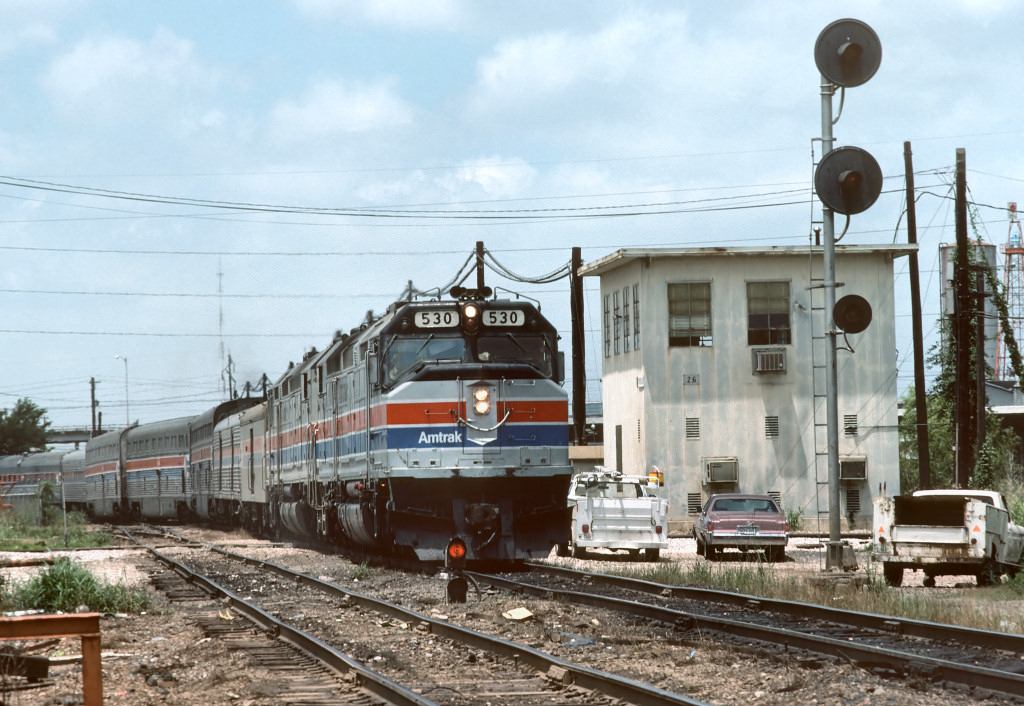
Above: It was likely the early 1940s
when John W. Barriger III took this photo from the rear platform of his business
car as his International & Great Northern (I-GN) train proceeded north past
Tower 26. Barriger is on Santa Fe tracks operated by the Houston Belt & Terminal
(HB&T) Railway and he has just crossed the Texas & New Orleans (T&NO) main line.
His train has begun to curve to the northwest where it will soon reach a right-of-way
hosting T&NO's line to Lufkin and the HB&T North Belt. There, Barriger's
train will turn north, paralleling and then crossing the T&NO at
Tower 71. Farther north at
Tower 80, his train will return to I-GN rails for his
trip to Palestine. (John W. Barriger III National Railroad
Library)
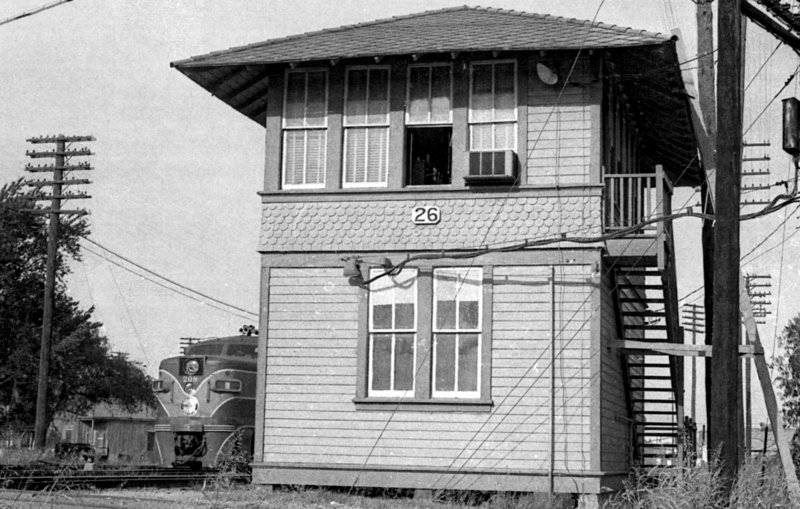
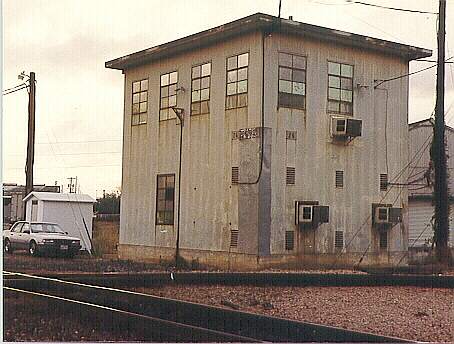
Below: Roughly ten years after Barriger's trip, this photo of the east side of
Tower 26 was taken
showing the
structure apparently unchanged. As the ladder to the roof remains leaned against
the north side of the tower above the staircase, perhaps it was permanently
attached? The tower architecture gives unmistakable
evidence that it was built by Southern Pacific (SP), resembling many other SP
towers, e.g., Tower 17,
Tower 21, Tower 81,
and others. (Joe R. Thompson courtesy of the Railroad
and Heritage Museum, Temple, Texas)
On September 29, 1903, Towers 25 and 26 were authorized
for operation by the Railroad Commission of Texas (RCT). They were manned interlocking
towers 1,300 ft. apart on the main line of the Texas & New Orleans (T&NO)
Railroad. The T&NO was owned by Southern Pacific (SP) and its main line ran
generally east/west across Houston north of Buffalo Bayou. Tower 25 was the
east tower, sitting in the northwest quadrant of T&NO's crossing of the International & Great
Northern (I-GN) Railroad's main track to
Palestine. Tower 26, to the west, sat in the northeast quadrant of T&NO's
crossing of SP's Houston East & West Texas (HE&WT) Railway main line to
Lufkin. Five hundred feet east of Tower 26, tracks of the Houston & Texas Central (H&TC) Railway,
also an SP company, reached the T&NO from the south and merged into it
heading east. This connection was controlled by Tower 26 as was another junction
five hundred feet farther east where a Gulf, Colorado & Santa Fe (GC&SF) Railway
spur crossed the T&NO. This crossing included a connecting track in the
southeast quadrant that supported movements between Santa Fe's
South Yard and T&NO's
Englewood Yard. North of the T&NO, Santa Fe's tracks curved back to the
northwest and terminated at an interchange with the HE&WT north of Tower 26.
Santa Fe transferred operation of this spur to the Houston Belt & Terminal (HB&T)
Railway shortly after HB&T was founded in 1905 by Santa Fe and three other
railroads.
In 1925, Missouri Pacific (MP) acquired the New Orleans, Texas
& Mexico (NOT&M) Railway which owned several other railroads. Two of
them were
the Beaumont, Sour Lake & Western and the St. Louis, Brownsville and Mexico.
Since those railroads each held a 25% ownership of HB&T, MP became a
half-owner of HB&T. The I-GN had recently been purchased by the NOT&M,
hence it also became an MP railroad. MP suddenly had three railroads in Houston, a market
it had never served.
In 1926, MP and
T&NO began planning for the consolidation of Towers 25 and 26, with Tower 26
to be the surviving tower. Combining the towers would reduce staffing expense
and the newer interlocker technology would cut maintenance costs. The railroads chose to build the new Tower 26
where the Santa Fe spur (by then, operated as part of HB&T's North Belt) crossed the T&NO. Construction began on June 21, 1927 in the
northwest quadrant of the crossing. Tower 25 was retired but it remained on
RCT's published lists of interlocking towers until the final list dated December
31, 1930 where it was footnoted as "Consolidated with No. 26". Whether the
listings indicated that Tower 25's structure -- or merely its separate
interlocking plant -- had survived those additional years is unknown. No photos
of Tower 25, nor the original Tower 26, have been located.
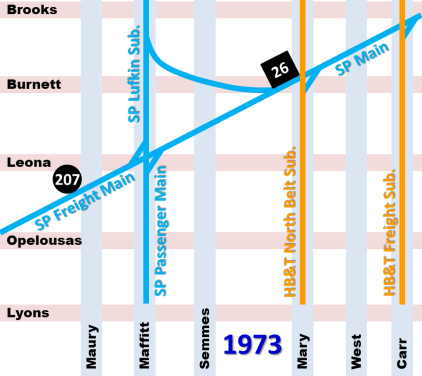
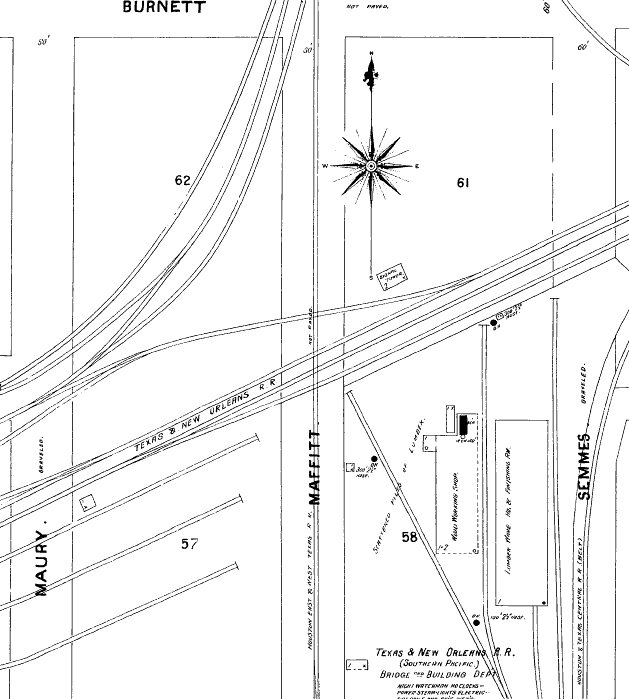
Main Tracks in the Vicinity of Towers 25 and 26
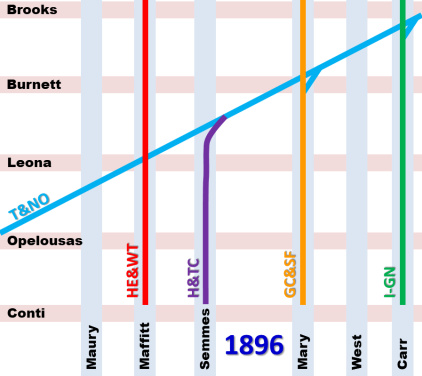
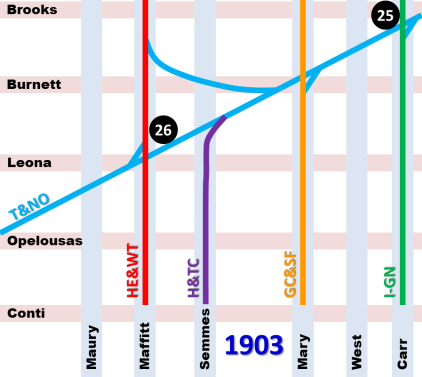
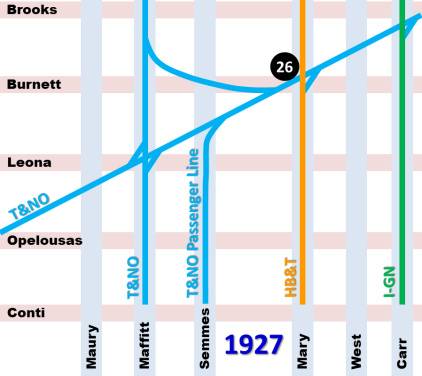
Above: The T&NO tracks intersected with four
main lines over the span of five street blocks. (Note that these were merely "platted"
streets, i.e. real streets elsewhere perhaps but merely rights-of-way
where the tracks were laid.) Prior to 1896, Santa Fe's spur had ended
at the T&NO. In 1895 or 1896 (above left)
it was extended north across the T&NO and then curved back to the west (beyond
the top of the graphic) to reach an interchange point with the HE&WT, which had
converted to standard gauge in
1894. In
1903 (above center), Towers 25
and 26 were built to manage interlockers for all of these
junctions. A connecting track was added behind Tower 26 so that trains using
the HE&WT tracks could go in and out of T&NO's Englewood Yard, two miles
to the east. In 1927 (above
right), a new Tower 26 was built adjacent to the HB&T (Santa Fe) tracks
so that Tower 25 could be retired. That occurred in 1928 by which time the HE&WT and H&TC had both been leased to
T&NO, to become fully merged in 1934. The H&TC line on Semmes St. became the
T&NO Passenger Main for accessing SP's downtown station and it also functioned as a
second main line all the way east to Englewood Yard. The other line was the
Freight Main, and the two mains rejoined a common right-of-way west of downtown at
Tower 14.
 |
 |
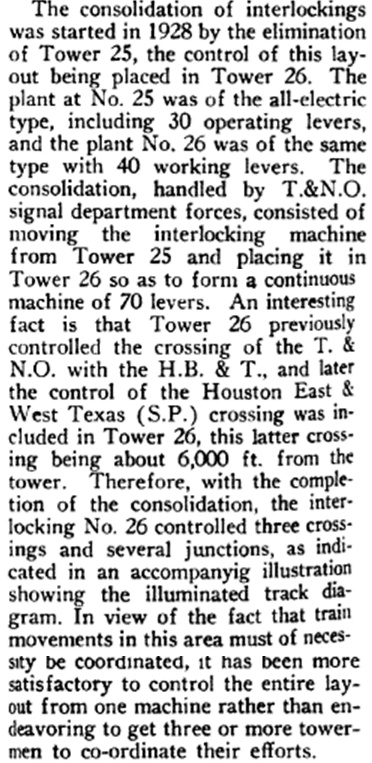
Above Left:
An article in the
1935 edition of Railway Signaling and
Communications written by an MP signals engineer described the
consolidation of interlockers that occurred in north Houston beginning in 1928.
This excerpt from the article explains that the process began with the
elimination of Tower 25. When the consolidation was complete, the result was
Tower 80 controlling the
Tower 71 and Tower 76 interlockers remotely, and Tower 26 controlling all of
the other interlockers and switches. The author's claim that the HE&WT crossing was 6,000 ft. from
Tower 26 is confusing; the distance was less than 1,000 ft. The article also
explains that a "telephone connected with loud speaker" (an "annunciator",
according to Tom Kline) was employed so that tower operators could hear whistle
signals as trains neared remote-controlled junctions.
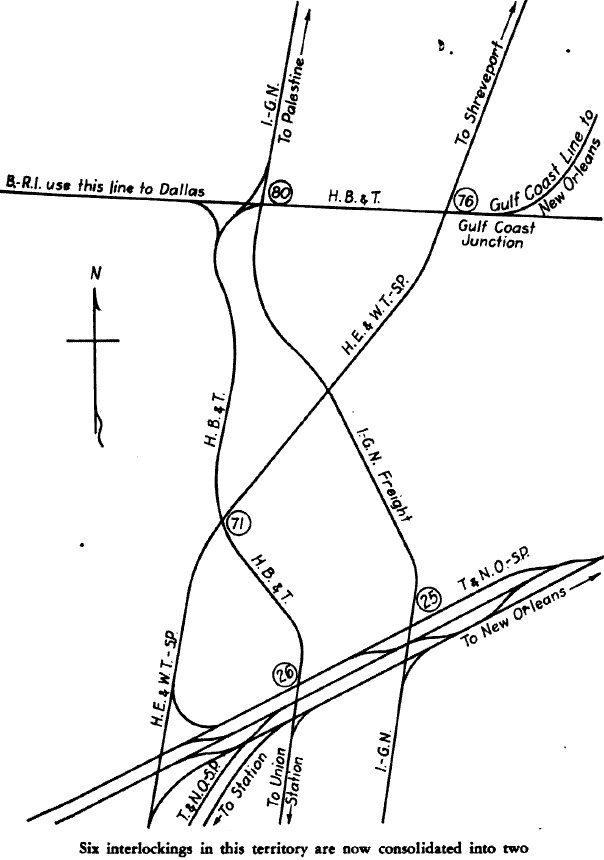
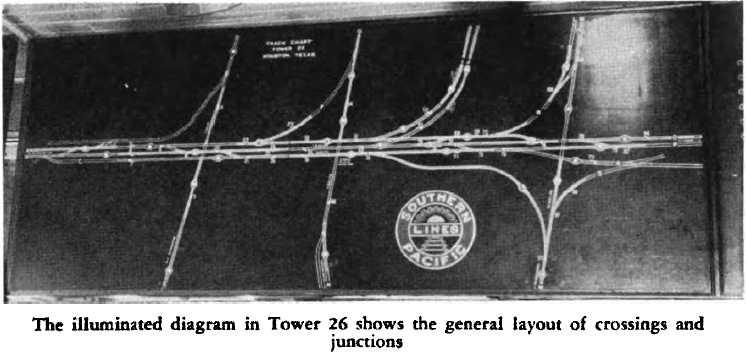
Above Right: This diagram
included in the article shows a simplified layout of the tracks in the subject
area of north Houston. Below:
The "illuminated track diagram" referenced in the excerpt was mounted
in Tower 26.
In 1956, Tower 207 was
established with an electric
interlocker, apparently tasked with controlling access to the east end of Hardy St. Yard (west of Maury
St. and north of the Freight Main.) The small tower was located in the northwest
quadrant of the Maury St. grade crossing. Three years later, Tower 26 was
rebuilt into a larger, more modern building, but at the same 1927 location.
Tower 26 eventually took over the controls for Tower 207 but the date has not
been determined. This was a continuation of the pattern of Tower 26 taking on
additional responsibilities as other towers were closed.
Tower 26 took over controls for Tower 71
in 1930, Tower 210 in 1961,
and Tower 13 in 1966. The Tower 26 structure was
torn down on November 10, 2001, but it had ceased to be occupied since 1988,
replaced by automation and remote operators. Hardy Street Yard was ultimately
abandoned as well, a decision made sometime in
the early 2000's by Union Pacific (UP), which had bought SP in 1996. By 2011, the yard was gone and all of
its tracks had been removed.
Below
Left: By 1968, HB&T had designated MP's former I-GN tracks as
the Freight Subdivision (later, "East Main".) The Santa Fe tracks
remained the North Belt Subdivision (later, "West Main".) The Tower 207 structure was probably gone, but a storage or equipment building
identified as "207" remained at its location for many years. When Interstate-10
was built in the late 1960s (about 500 ft. south of Lyons St., formerly Conti
St.), a Maffitt St. bridge was built and this became the new Passenger
Main. The Semmes St. tracks were abandoned.
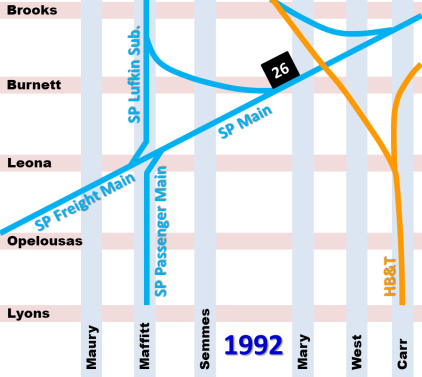
Below Center: By the early
1990s,
the diamond on Maffitt St. had been removed,
but the Lufkin Sub. connecting tracks in the two northern quadrants were
retained. The Passenger Main track from the south curved east as the second main to Englewood Yard.
These changes occurred as a major track relocation project was underway to
abandon HB&T's West Main track on Mary St. It was replaced by a combined double track on
the East Main including a new bridge over Buffalo Bayou. The double track curved across SP's tracks
at Tower 26 to rejoin the West Main to the north. This double track continued northwest and
combined with SP's Lufkin Sub, turning north with
multiple tracks and crossovers up to Tower 210, eliminating
Tower
71. A Brooks Street Connector for HB&T/Lufkin Sub access to Englewood Yard was built northeast of
Tower 26. HB&T's East Main tracks on Carr St. north of the SP Main were abandoned except
for a short segment near Tower 210. A Carr Street Connector
was built so that trains coming north on the HB&T double track could continue to reach Englewood
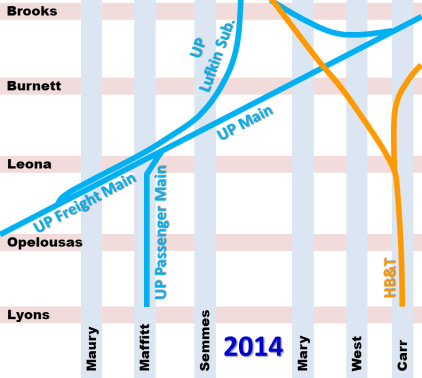
Yard. Below Right: By the end
of 2014, the tracks on Maffitt St. north of the UP Main had been removed,
eliminating connections to the Lufkin Sub in both quadrants. Instead, a new
Maury Street Connector was added from the UP Freight Main to facilitate the
Lufkin Sub access.
Tower 207
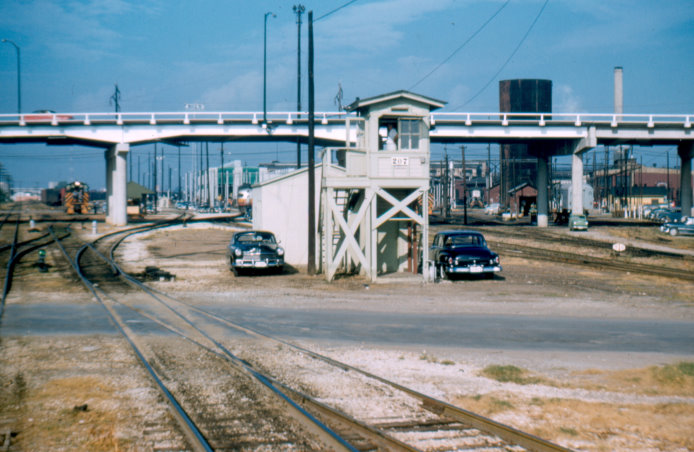
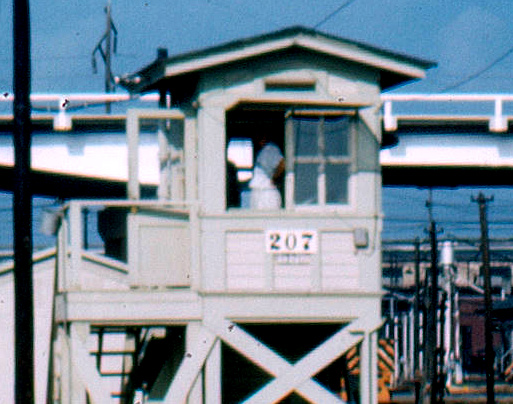
Above:
This photo of Tower 207 (with magnification at right) was produced from a slide captioned
"Houston, Texas SP fan trip, 8/31/57".
The tower, commissioned on November 26, 1956, sat adjacent to the Maury Street
grade crossing of the T&NO Freight Main, which appears to be double track at
this time. Switches for Hardy Street Yard access from both Freight Main tracks
are immediately beside the tower. Historic aerial imagery from 1962 shows that
the first track on the opposite (north) side of the tower continued east across
the Lufkin Subdivision and then curved back southward slightly to connect into
the T&NO Freight Main, apparently to provide an additional track into the yard. The
precise duties of Tower 207 are unknown, but it is apparent from the small
tower's design
that the operator needed good visibility in all directions yet required relatively little workspace. (Carl Codney collection)
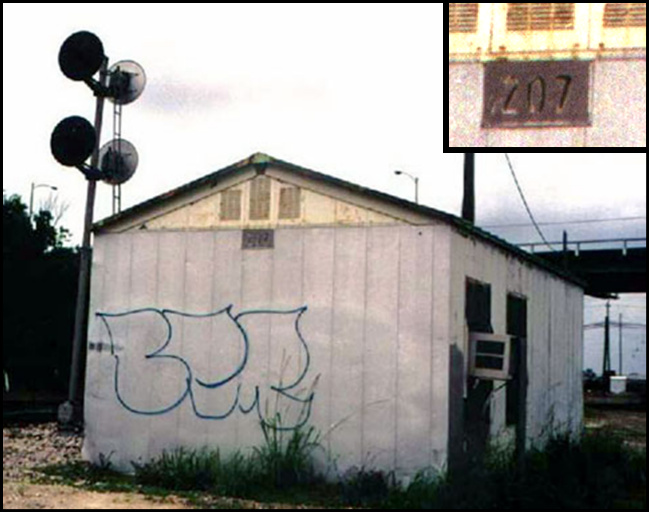
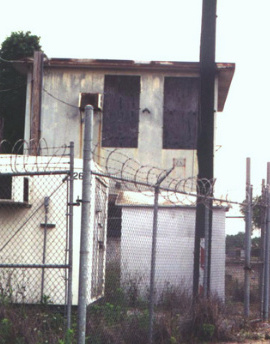
Below Left: It is not known
how long the wooden tower survived, but the metal building behind it
(labeled "207", see inset) lasted many years. (Jim King photo, 1998)
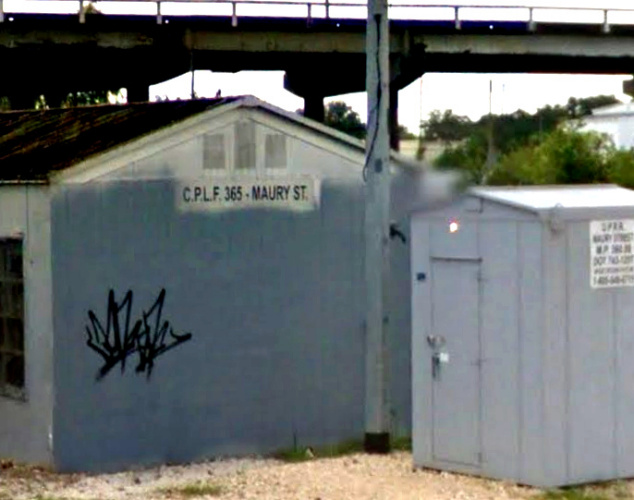
Below Right: Google Street
View shows that with a new designation, it was still standing in June, 2014, but
it does not appear in the next Street View imagery dated September, 2015.
In the late 1980s, the State of Texas began planning to
widen the US 59 freeway through downtown Houston which would necessitate track
relocations near Tower 26. The railroads cooperated with the State by using this
as an opportunity to restructure traffic flow from downtown to Tower 80,
sharing selected HB&T tracks and rights-of-way with SP while abandoning others.
Essentially, the plan was:
1) Abandon HB&T's West Main from south of
Buffalo Bayou to Tower 26, including transferring ownership of HB&T's bascule
bridge at Buffalo Bayou (Tower 139) to the State
which agreed to preserve it; the State also took ownership of HB&T's West Main
bridge over Interstate 10 and then paid for its removal.
2) Double track HB&T's East Main north from downtown and reroute it onto the
West Main at Tower 26, building a new bridge over Buffalo Bayou to support the
double track, replacing the old I-GN bridge.
3) Abandon HB&T's East Main
on Carr St. north of the UP Main,
retaining a few tracks immediately south of Tower 210 for car storage and future
industry support.
4) Double track HB&T's main from Tower
26 to Tower 71, sharing the tracks with SP's Lufkin Subdivision and removing the Tower 71 crossing.
5) Double track HB&T's main from Tower 71 to Tower 210
using SP's Lufkin Subdivision right-of-way.
6) Double
track HB&T's main along the former MP (I-GN) right-of-way from Tower 210 to Tower 80.
The plan was executed over many years beginning with replacement of the former
I-GN bridge over Buffalo Bayou in 1991.
Annotated Satellite View of Tower 26 Vicinity
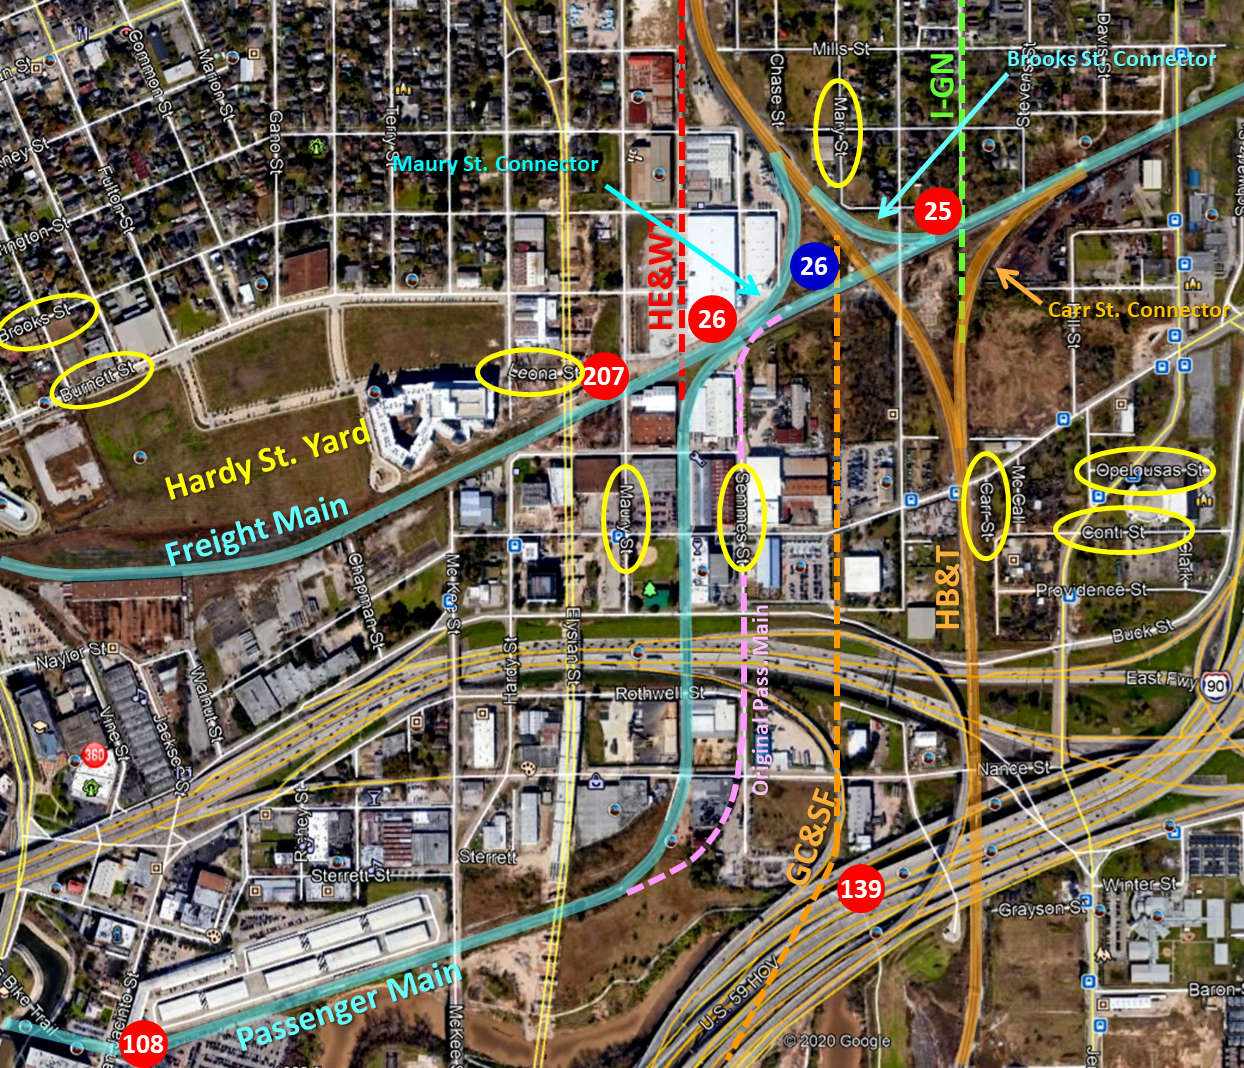
Above: This 2018 Google Earth
satellite image of the vicinity of Tower 26 has been annotated to identify items
discussed in the preceding graphics. The blue Tower 26 is the 1927 location; the
red one is the 1903 location. The yellow ovals highlight street names that
appear in the graphics. The dashed pink line shows the original H&TC
right-of-way that was used as the Passenger Main on Semmes St. Between Tower 26
and Tower 14 farther west, the Passenger Main provided an alternative to the
Freight Main via
Tower 108 and SP's passenger station. The dashed
orange line was the Santa Fe spur that became the HB&T West Main.
Tower 139 sat on the north bank of Buffalo Bayou
where this line crossed on HB&T's bascule bridge.

Above: In this photo taken by
Barriger in the late 1930s, the view from the rear of his SP train is looking
west on the T&NO main line as he passes Tower 26 to his right. This was well
after the 1927 relocation of Tower 26, so the crossing track in the foreground
is the HB&T North Belt. Just beyond the HB&T track, the SP Passenger Main
on Semmes St. comes in from the left; this was Barriger's route from
SP's passenger station. On the far side of Tower 26, the connector to the right
leads to SP's Lufkin Subdivision. (John W. Barriger III National Railroad
Library)
Below:
Essentially the same view as above but taken a few years later, Barriger is
looking west on the T&NO at Tower 26. He's shooting his camera off the side of
his business car as it heads north on the HB&T North Belt behind an I-GN train.
This photo was taken a few seconds prior to the photo at the top of the page. (John
W. Barriger III National Railroad Library)


Above Left: Barriger took this
photo from his eastbound SP train a few seconds after the earlier photo taken
beside Tower 26. His car has now crossed the I-GN main track with Tower 26
partially obscured by the adjacent railcars. The connecting track coming in at
left is in the southeast quadrant of the I-GN crossing, essentially the 1930s
version of what later became the Carr Street Connector. (John W. Barriger
III National Railroad Library) Above Right:
This view of the west side of Tower 26 with a passing eastbound freight
was likely taken in the mid-1950s. (Joe R. Thompson, courtesy
Railroad and Heritage Museum, Temple) Below
Left: This image faces the southeast corner of the 1959 version of Tower 26. (Paul Fafrak photo, undated) Below Center:
UP EMD SD40-2 power is
pictured going
past an abandoned Tower 26. (Tom Horan photo, undated)
Below Right: The "26" numerals are barely visible on the equipment
cabinet, and badly faded on the side of the tower. (Jim King photo)

Below: Amtrak's Sunset Limited
rolls past Tower 26 in June, 1978 (Gary Morris photo)
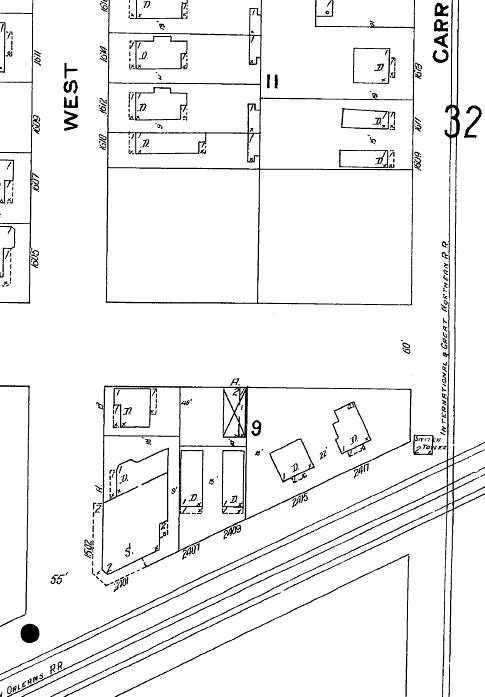
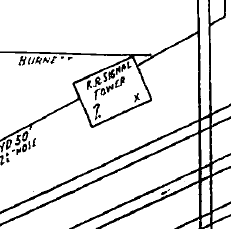
Above Left: The 1907
Sanborn map shows Tower 26 as a 2-story
"Signal Tower" in the northeast quadrant of the T&NO/HE&WT crossing.
Above Right: The 1907 Sanborn map shows Tower 25 as a 2-story
"Switch Tower" in the northwest quadrant of the T&NO/I-GN crossing.
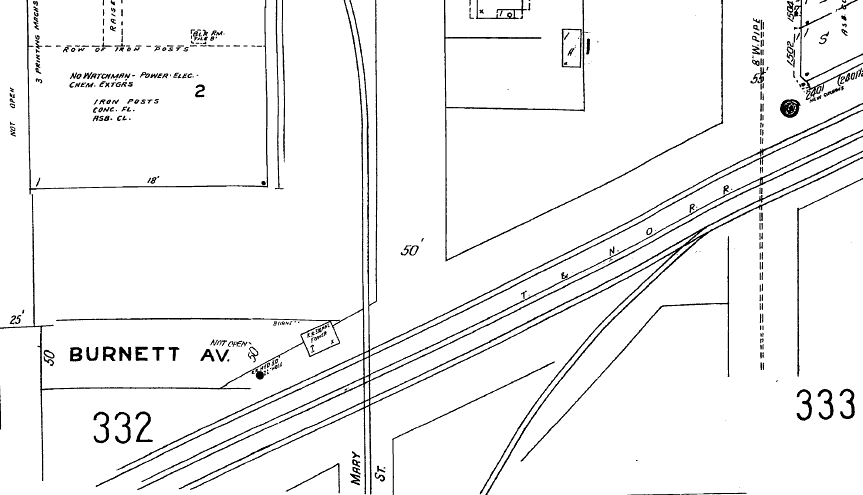
Below: Updates to the Sanborn
maps in 1951 show the new Tower 26 at the
intersection of Burnett Ave. and Mary St. in the northwest
quadrant of the T&NO/HB&T
crossing. The 1951 map also shows the two original tower locations as vacant.
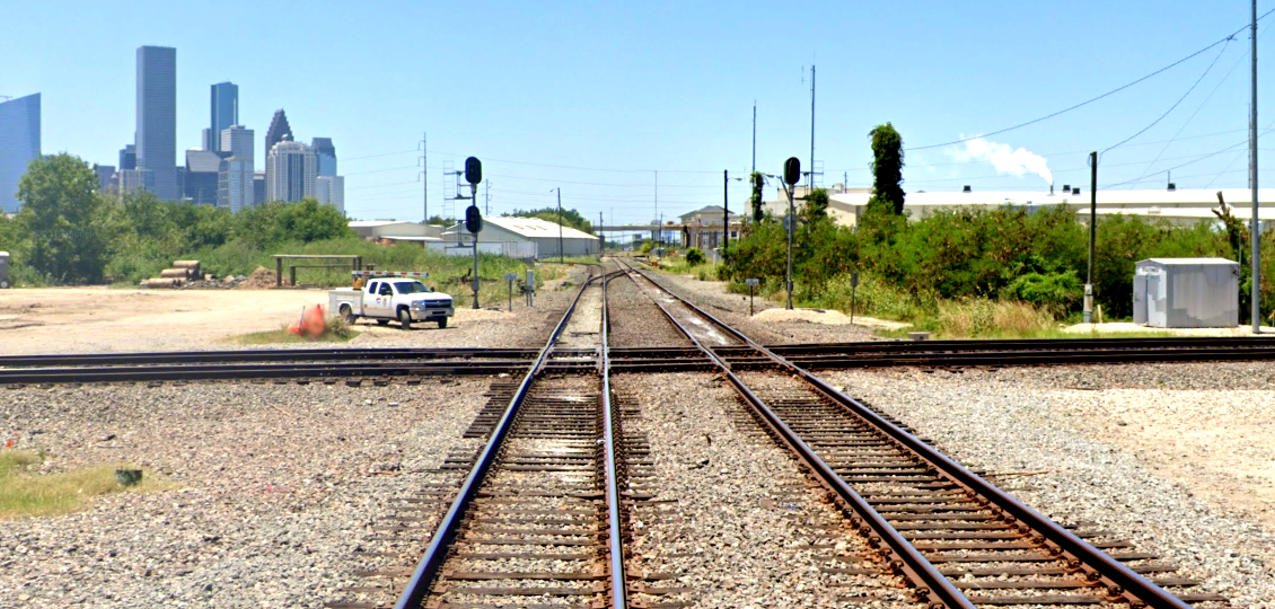
Tower 26 Crossing - Views from West St.
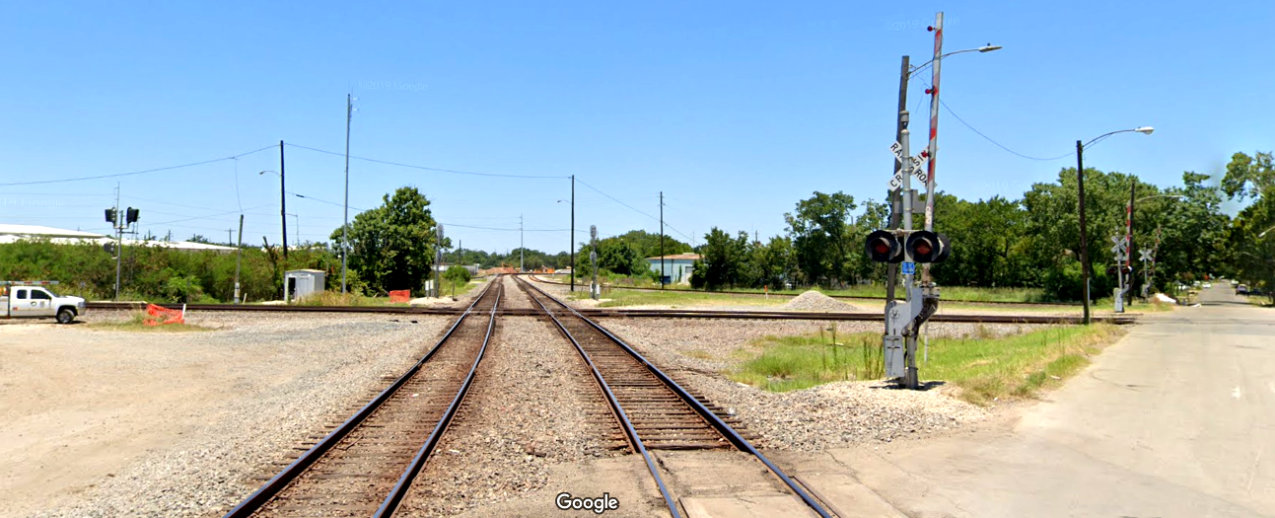
Above: West St. remains open
and accessible through the Tower 26 junction area. This July, 2019 view is
northwest along the HB&T, a few yards southeast of UP's double track main
crossing. The door is open so maintenance is likely in progress at the Tower 26
equipment cabinet in the northwest quadrant. The third set of grade crossing signals in the distance at far right
are for the Brooks Street Connector which can be seen merging with the HB&T
right-of-way ahead. Below:
Looking southwest along the UP main track at the HB&T crossing, the passenger
main can be seen coming in from the left. The Maury Street Connector is behind
the trees that are near the equipment cabinet and in front of the building in the
background.
Tower 26 Area Drone Photography by Abel Garcia
(Nov. 2020)
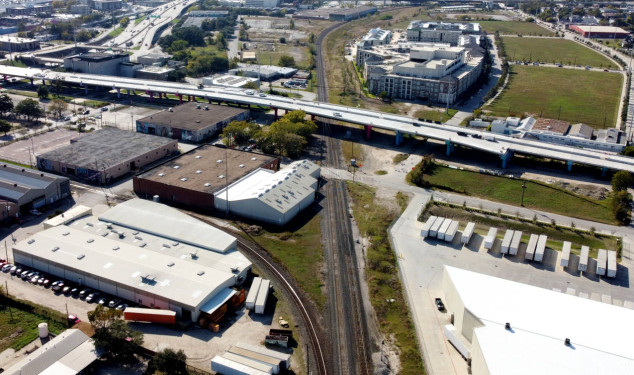
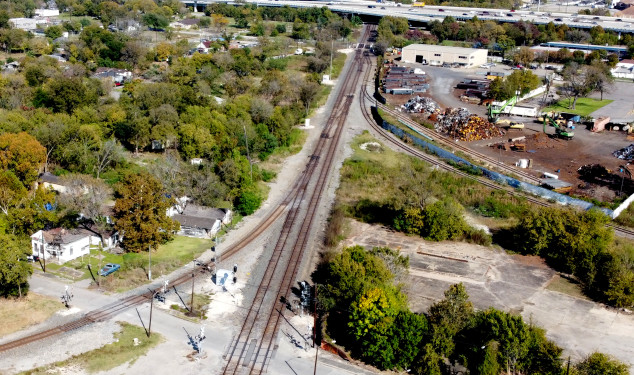
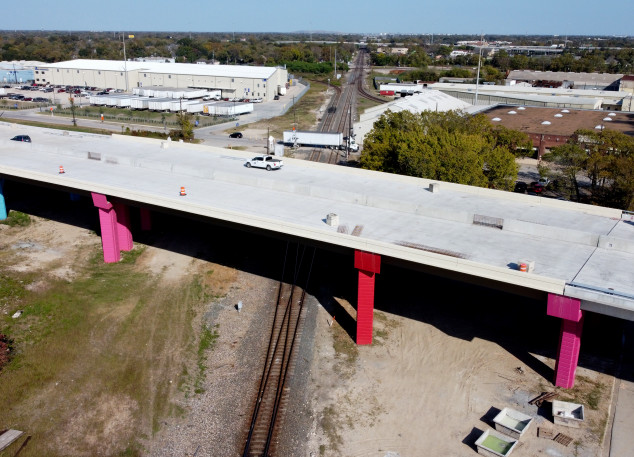
Above Left: Facing southwest
with the drone camera approximately over the Tower 26 diamonds, the former Hardy
St. Yard is visible hosting a large apartment complex just beyond the elevated (and under
construction) Elysian Viaduct. The grade crossing is Maury St, where Tower 207
was located. The Passenger Main is seen curving to the
left (south) toward Buffalo Bayou and the Amtrak station.
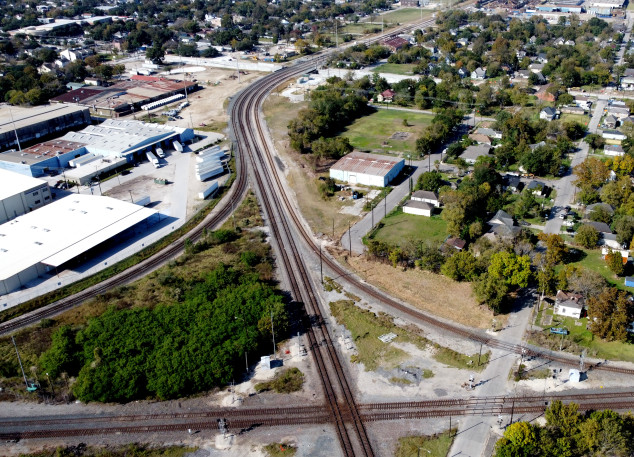
Above Right: The camera is now
facing northeast above the diamonds. The Carr Street Connector comes in from the
south at the right center edge of the image and merges onto the main just before
the tracks pass beneath the US 59 freeway. At lower left, the Brooks Street
Connector comes in from the north to join the main track about where the I-GN
tracks on Carr Street originally crossed.
Below Left: Facing north, the
four diamonds at Tower 26 are at the lower center edge of the image. The Maury
Street Connector from lower left and the Brooks Street Connector from lower
right merge with the HB&T double track to present four tracks making the curve
onto the right-of-way shared originally by HE&WT and HB&T.
Below Right: The camera is
facing east from west of the Elysian Viaduct. The Maury Street Connector switch
is visible at the bottom of the image. The connector curves north in the
distance as the passenger main comes in from the south to form a second main
line to Englewood Yard.
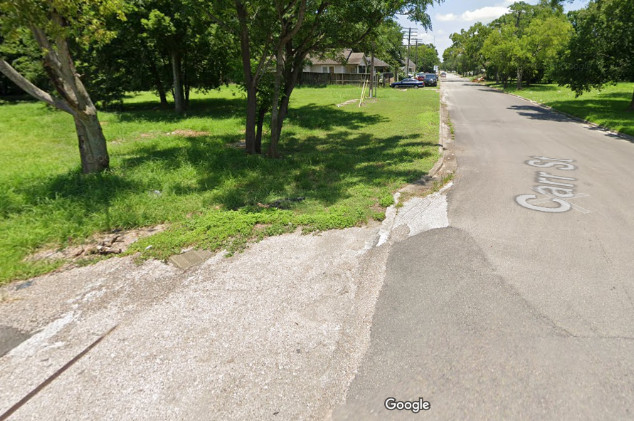
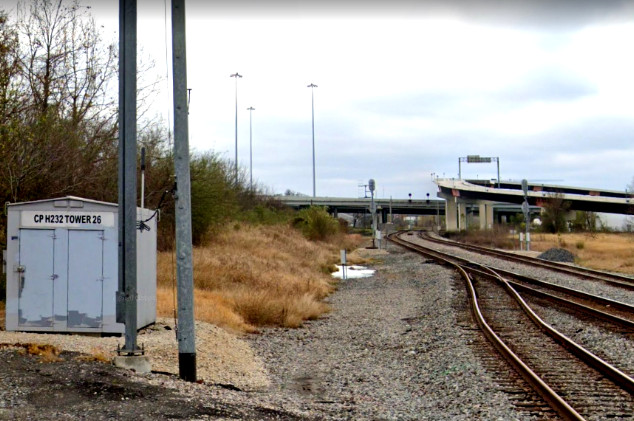
Above Left: The view north on Carr St. from just north
of the UP Main conveys the impression this has always been a residential street,
not the HB&T Freight Subdivision. But the rails buried in the pavement provide a
clue. (Google Street View, 2019) Above Right:
The HE&WT right-of-way on Maffitt St. remains in use with tracks curving to the
east to join the UP main instead of crossing to continue to Lufkin as they did
back in 1877. (Google Street View, 2020) Below
Left: Facing south at Lyons Ave., the Carr Street Connector
switch is in the foreground on the east track of HB&T's main line. The cabinet
indicates this is Tower 26 territory, although the actual tower was about 1,100
feet behind the camera. (Google Street View, 2020)
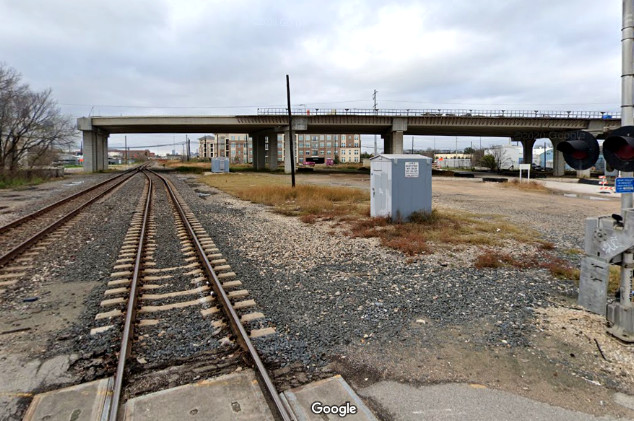
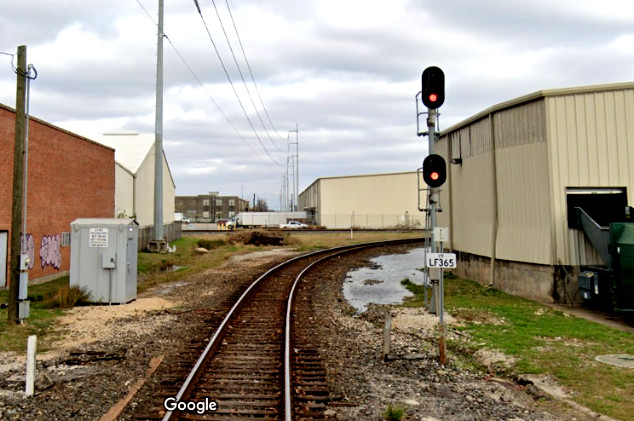
Below Right: The Maury St. Connector merges onto the
main track in the distance. Compare this west view from Maury St. with the 1957
image of Tower 207. (Google Street View, 2020)