Texas Railroad History - Tower 193 - Sinton
A Crossing of the San Antonio & Aransas Pass Railway and
the St. Louis, Brownsville and Mexico Railroad

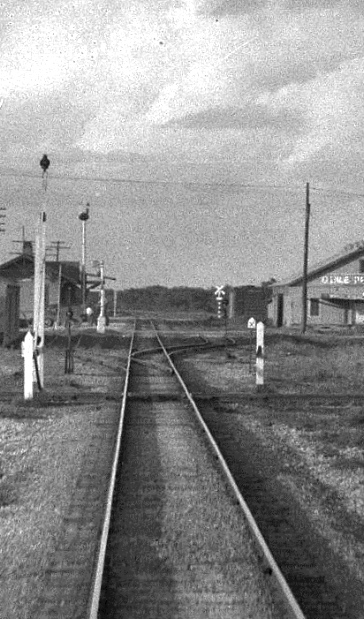
Above Left: John W. Barriger III
took this photo from the rear platform of his business car as he passed
southbound through
Sinton in the late 1930's or early 1940's. Barriger's view is to
the northeast along the St. Louis, Brownsville & Mexico (SLB&M) Railway, his photo
no doubt prompted by the sudden appearance of the crossing of a San Antonio &
Aransas Pass (SA&AP) rail line. Above Right:
As this was prior to the installation of an automatic interlocker in 1947, the
SA&AP crossing is protected by the manual gate visible to
the left of the diamond in this magnified view, with the tall pole being the hinge post. An angle arm
is visible descending from near the top hinge down to the outside extent of the
horizontal gate bar, and it appears to be casting a narrow linear shadow onto
the bottom of the hinge pole. In front of the pole from this angle, the smaller white
post is the latch point for the gate closed against
the SA&AP. An equivalent latch post is across the tracks to the right so the
gate can be latched against the SLB&M when SA&AP trains need to cross.
(John W Barriger III National Railroad Library)
Sinton was founded in 1886, shortly after the San
Antonio & Aransas Pass (SA&AP) Railway passed through the area as it constructed
a line from San Antonio to Corpus Christi. Land for a townsite was provided by the
Coleman - Fulton Pasture Company, so the town was named for the company's majority
stockholder, David Sinton, a Cincinnati investor, purportedly the richest man in Ohio. In 1894, Sinton became the seat of San Patricio
County, but it remained simply a tiny community on the arid plain of south
Texas, about thirty miles inland from the Gulf of Mexico at Port Aransas. When the St. Louis, Brownsville & Mexico (SLB&M) Railway built
through Sinton in 1904, the population still hadn't reached 100, but by 1910, the town had a bank, a hotel, a newspaper and several
businesses.

Railway Age, November 6, 1903 |
The SLB&M's grading work between
Sinton and Robstown had been completed by November, 1903. Track-laying
was nearing completion a year later, and operations began in early 1905. |
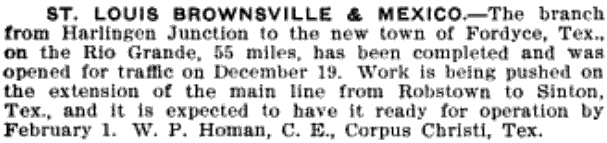
Railway Age, December 23, 1904 |
The railroads crossed at Sinton in an X-pattern, with
the SA&AP line running northwest - southeast and the SLB&M line running
northeast - southwest. To the northwest, the SA&AP tracks went to San
Antonio where the construction of the line to the coast had begun. Southeast of Sinton, the SA&AP tracks went to Gregory and Portland,
and then crossed over Corpus Christi Bay to serve the port of Corpus Christi. An
extension from Gregory to Aransas Pass and Rockport was built in 1888. The SLB&M line was part of a major route
between Brownsville and Houston via Algoa.
In 1925, the SLB&M became owned by Missouri Pacific (MP), the same year that the
SA&AP came under Southern Pacific (SP) ownership.
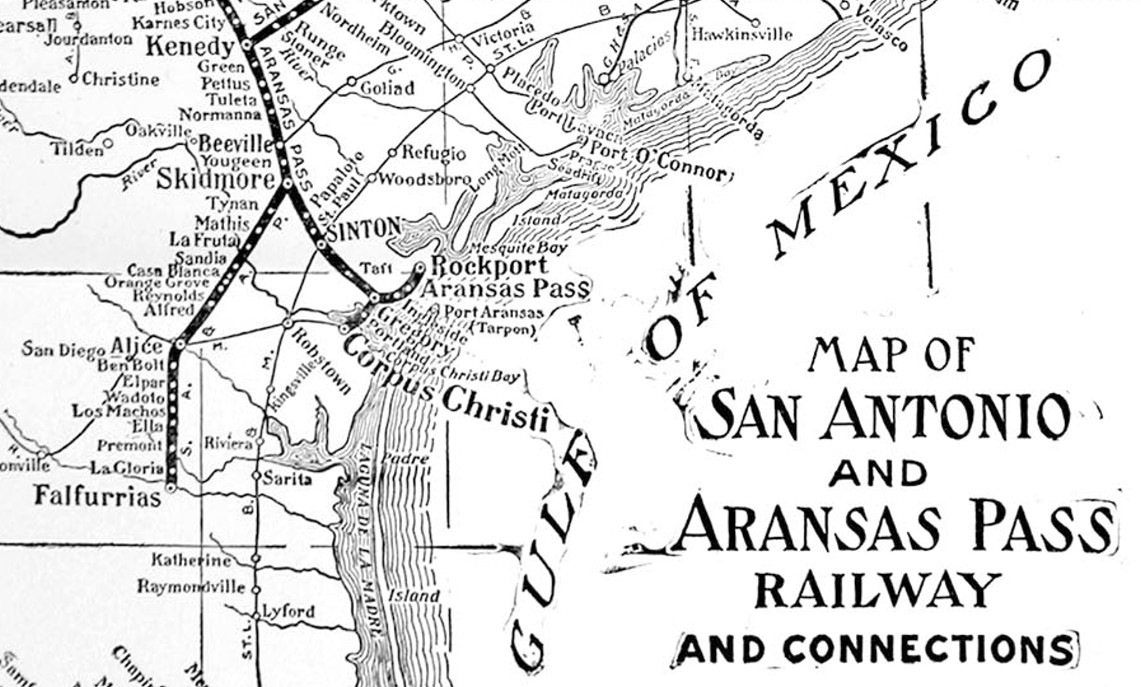
Above: This snippet from a 1910 map of the SA&AP route
network (courtesy Texas Transportation Archive) shows "SINTON" in all capital
letters, for no apparent reason. By this time, the SLB&M line had been operating
for several years and is shown passing through Sinton.
The SP/MP crossing at Sinton had never been
interlocked but a gate had been installed. When
railroad crossings in Texas began to be regulated for safety purposes by the Railroad
Commission of Texas (RCT) in 1901, the railroads were ordered to install gates
at all crossings until RCT could mandate interlockers for specific crossings on
a prioritized basis. The idea was to spread out the timing of interlocker
installations to give RCT engineers adequate opportunity to review each plan
while also reducing the immediate financial impact on the railroads. Regardless
of the gate position, all trains were
still required to stop before proceeding over
the diamond at a gated crossing. Eventually, this policy changed as a result of
the involvement of the Interstate Commerce Commission (ICC), to which Congress
had granted national authority for railroad safety. The Signal Inspection Act passed by
Congress in 1937 specifically granted the ICC authority
over crossings, and it appears that at least by this timeframe (if not
earlier), trains were allowed to proceed over the diamond of a properly gated
crossing without
stopping, but only by approaching the diamond at restricted speed so that there would be
sufficient time to stop if the gate was closed against them. One example of this
"restricted speed" rule for gated crossings is in the ICC's 1941 order approving
a gate to replace the automatic interlocker at Tower 175.
 |
San Patricio County commerce was largely driven
by ranching until oil was discovered in 1935. The oil boom caused
refineries and other facilities to locate along the nearby bays,
increasing rail traffic. By the mid 1940s, traffic levels through Sinton
justified installation of an automatic interlocker,
formally designated as Tower 193 by RCT
in 1947.
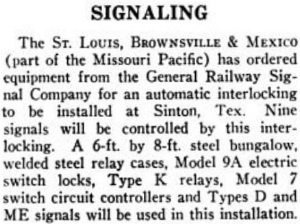
Left Top: The March 22, 1947 issue of
Railway Age reported that an
automatic interlocking plant and associated signals had been ordered
from General Railway Signaling Company for the crossing at Sinton. The SLB&M was the busier
railroad through Sinton and they undoubtedly took responsibility for
maintaining the interlocker; the recurring maintenance expenses would be
shared by both railroads.
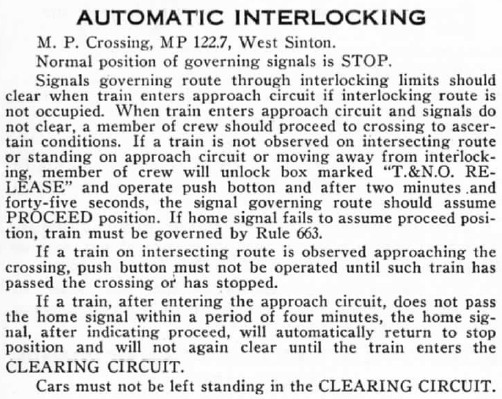
Right:
A Southern Pacific Employee Timetable issued in December, 1947 provided
rules pertaining to operation of the new automatic interlocking at "West
Sinton". Oddly, SP reserved "Sinton" for the location of the passenger
depot which was about 0.4 miles northwest of the crossing, i.e. "Sinton"
was west of "West Sinton".
Left Bottom: This 1951
image ((c) historicaerials.com) of the Tower 193 crossing shows the 6 x
8 ft. steel bungalow on the north side of the diamond casting a shadow
to the northwest. A cabinet remained in this spot at least
through March, 2006. |
 |
SP's access into Corpus Christi from Sinton via Gregory
and Portland used their bridge over Corpus Christi Bay. The bridge had been problematic
from the beginning, subject to frequent damage from tropical storms and
requiring a drawbridge to allow water traffic to pass. In November, 1964, the ICC approved a plan to allow SP to abandon the bridge and access
Corpus Christi using
trackage rights on MP from Sinton. SP trains would use the
west quadrant connector at Tower 193 for movements between their tracks to San
Antonio and MP's tracks south of Sinton to Odem where MP's line from San Antonio
crossed leading into Corpus Christi. The west quadrant connector dated back to
at least 1922, where it and the south quadrant connector both appear on the
first Sanborn Fire Insurance map of Sinton.
In 1987, a derailment on SP's tracks near San Antonio
caused a bridge failure that hastened SP's decision to abandon the line to
Sinton. By 1995, it was completely abandoned from the southeast outskirts of San
Antonio to the northwest edge of Sinton. Southeast of Sinton, SP's tracks remained operational,
and they were soon owned
by Union Pacific (UP) which acquired SP in 1996. As UP had also acquired MP (in
1982), it owned both rail lines through Sinton. The diamond in Sinton along with
connecting tracks in both the south and west quadrants remained in place after
the 1995 abandonment. The west quadrant connecting track led to the former SP
yard and industries along the main track extending to about two miles northwest
of Sinton. The diamond had been removed by October, 2005, but the west
quadrant and two miles of track to the northwest remained intact as of March,
2006, and the interlocker bungalow was still sitting trackside north of the
diamond.
Satellite imagery confirms that these tracks had been completely removed by
April, 2008, along with the interlocker equipment and signals. The south quadrant connector remains in place to serve industries toward Gregory and Aransas Pass. The former SLB&M line is part of a
major artery from the Rio Grande Valley to Houston and continues to carry
substantial traffic for UP and for the two major railroads that have trackage
rights through Sinton: Burlington Northern Santa Fe and Kansas City Southern.
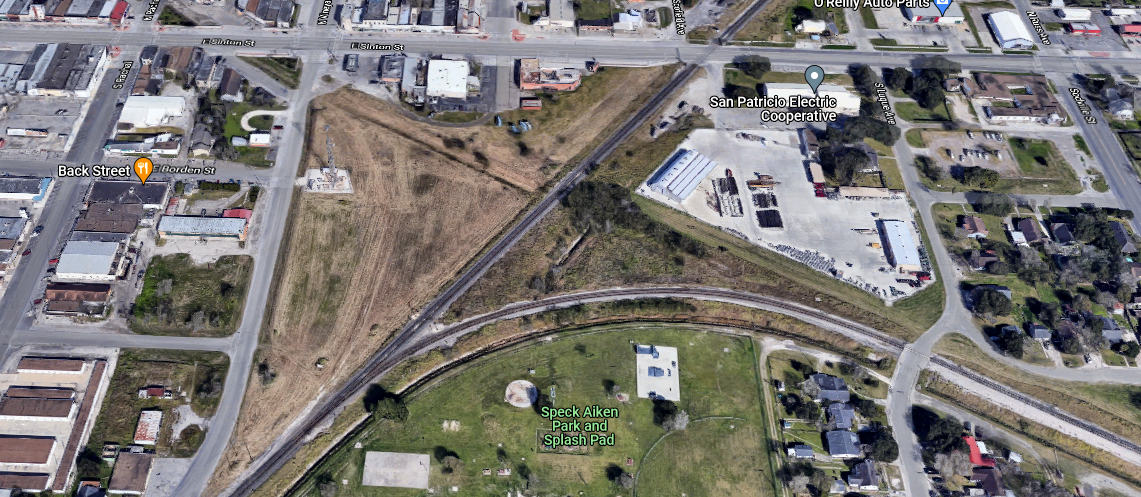
Below: a recent 3D image of
the Tower 193 crossing (Google Maps)


Above Left: This is the view in Sinton c.2001 along the SA&AP line
looking northwest toward the diamond. At that time, the tracks remained in place
across the diamond after abandonment to allow access to the "old SP
yard" which was still in use northwest of the crossing.
Above Right: This corresponding view
southwest along the SLB&M
line shows two connecting tracks in the distance. The one at
right is the west connector which has since been removed. The one to the left is
the connector in the south quadrant that remains in use today (Carl Codney
photos) Below Left: This 2011
Google Street View looking northwest from Ave. D shows the south connector
curving to the left to join the former SLB&M line to the southwest. The SP
right-of-way that originally continued straight ahead is no longer apparent.
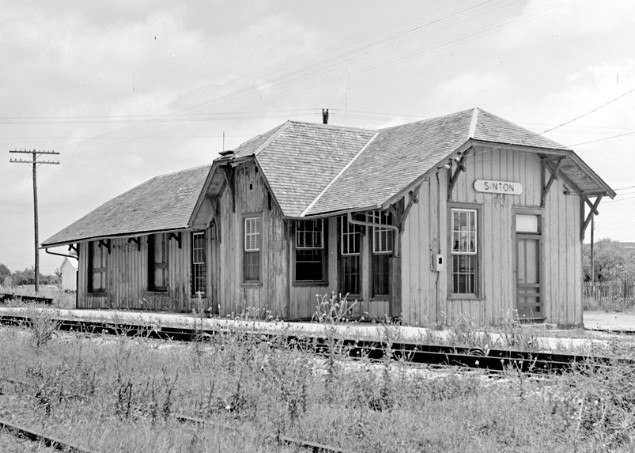
Below Right: Everett DeGolyer,
Jr. took this photo of the SA&AP passenger depot at Sinton on June 6, 1962. SP
had been using the building for decades; it is no longer standing.
(DeGolyer Library, Southern Methodist University)